The Trans-Proteomic Pipeline Guide for Kojak Analysis
The Trans-Proteomic Pipeline (TPP) is a suite of tools for analysis of mass spectrometry based proteomics. The TPP includes Kojak and several supporting software tools for streamlined identification, statistical validation, and visualization of cross-linked peptides analyzed by shotgun MS. Currently, this is the recommended pipeline to use to conduct Kojak data analysis from raw spectra to results.
This tutorial has been revised for use with TPP version 6.0.0-rc9 and newer. Use of Kojak with older versions of the TPP is not recommended.
Logging Into the TPP and Selecting the Kojak Pipeline
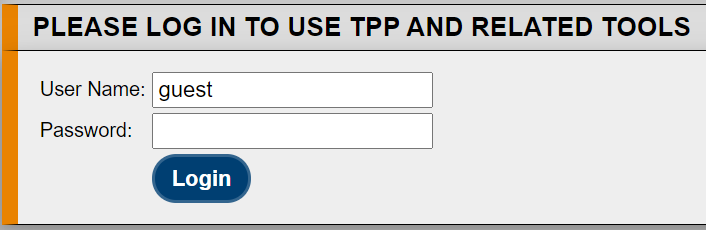
1. Log in as "guest"
The TPP contains a browser-based GUI named Petunia. It is accessed by browsing to this location: http://localhost:10401/tpp/cgi-bin/tpp_gui.pl. To log in to the TPP, use the default guest user name. The password is guest.
2. Select the Kojak Pipeline
The TPP contains pre-frabricated pipelines for common shotgun proteomics analyses. Among the available pipelines, choose Kojak.

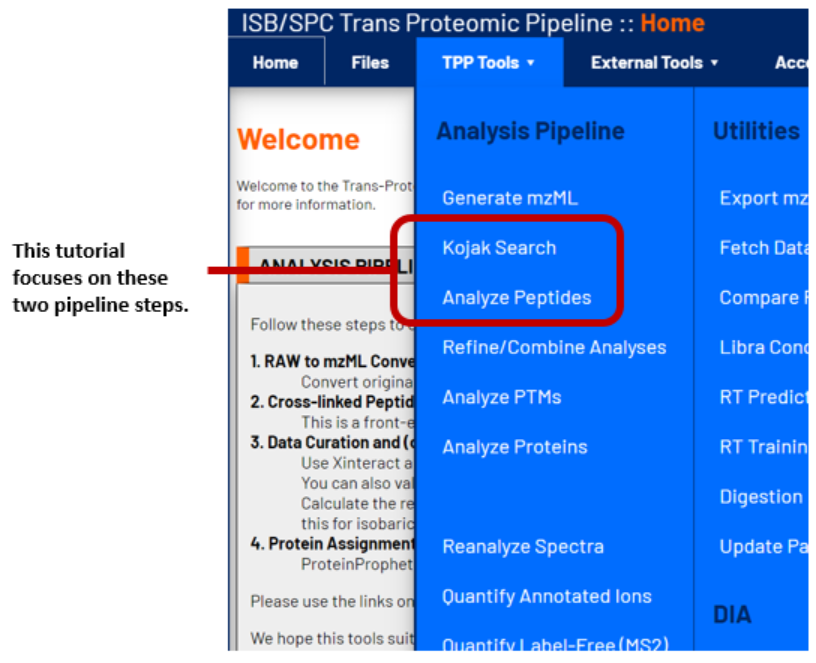
The Kojak Pipeline contains several steps that have been organized in the TPP Tools dropdown menu shown below. Starting from raw data, proceed through each stage to complete a Kojak analysis. However, it is possible to revisit any of the stages to repeat that portion of the analysis with different parameters or additional data. For the purposes of this tutorial, focus will be on the two highlighted stages. The TPP also contains many other useful utilies (e.g. a FASTA database creation tool), which are described in the TPP Overview Website.
Starting a Kojak Database Search
Following conversion of your raw data to mzML files, select the TPP Tools->Kojak Search pipeline stage. A search interface will appear in your browser.
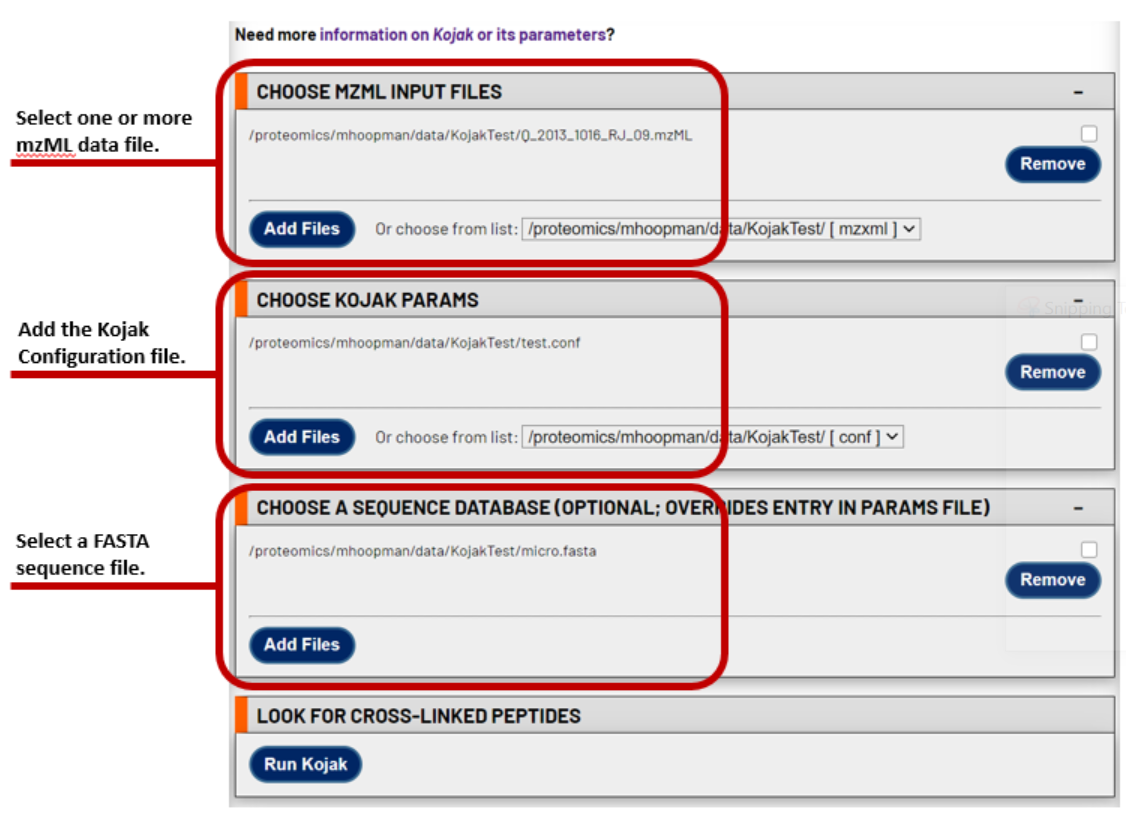
1. Select the mzML file(s) to search
Select one or more mzML files that you wish to search with Kojak. This interface allows for easy batch analysis of all the data using the same search parameters and FASTA database.
2. Select the Kojak configuration file
Next, select the Kojak Configuration containing your desired parameters. Instructions for each configuration file parameter are found here. During Kojak searches in the TPP, the MS_data_file and database parameters are replaced with the values provided in this TPP search interface.
3. Select the FASTA sequence file
Finally, select the FASTA sequence database. The same FASTA sequence database will be used for each mzML file in the search.
4. Press the **Run Kojak** button
This final step begins the search. A new window will appear that shows the progress of the search(es). Any output normally reserved for a command terminal is contained in a window for you to review. Should any issues appear during the search, warning and error messages will appear there.
Perform PSM and CSM Statistical Validation
Kojak returns the best-scoring peptide spectrum match (PSM) or cross-linked spectrum match (CSM) for all spectra searched. However, having the best score does not mean a correct match was found. Statistical validation must be performed to estimate a false discovery rate threshold and indicate the PSMs and CSMs that are likely correct. This statistical validation is performed by PeptideProphet (for PSM and CSM-level validation) in the TPP, and iProphet (for peptide-level validation). Both tools are operated from a convenient interface found at TPP Tools->Analyze Peptides
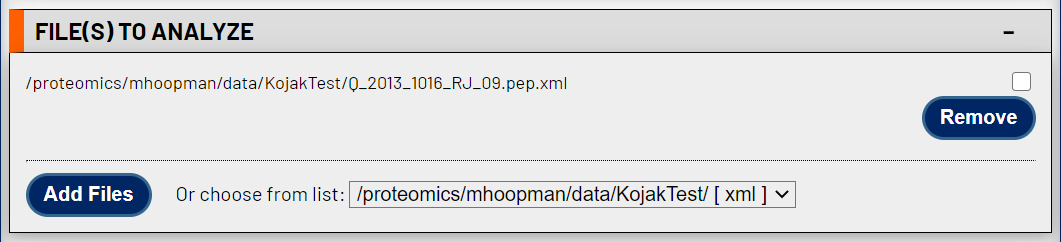
1. Select one or more Kojak results files
Valid input are in pepXML format, which is one the formats that Kojak exports after completing its searches. Add your Kojak search results files here. Files can be validated individually or combined by selecting multiple pepXML files at this stage. For an experiment where multiple data files were collected as part of the same experiment (i.e. searched with the same parameters in Kojak), it is actually recommended to combine the results here as the statistical validation often benefits from larger numbers of input spectra.
2. Choose a name for your statistical validation results
Type in any name for the Output Filename. Be sure to include .pep.xml as the output file extension. Output from PeptideProphet and iProphet are also in pepXML format. Advanced users may choose to filter their results by altering the parameters of this step, however this is often not necessary or recommended. Leaving the default paramters will keep all results - both high and low scoring - in the output for inspection.

3. Set the PeptideProphet parameters
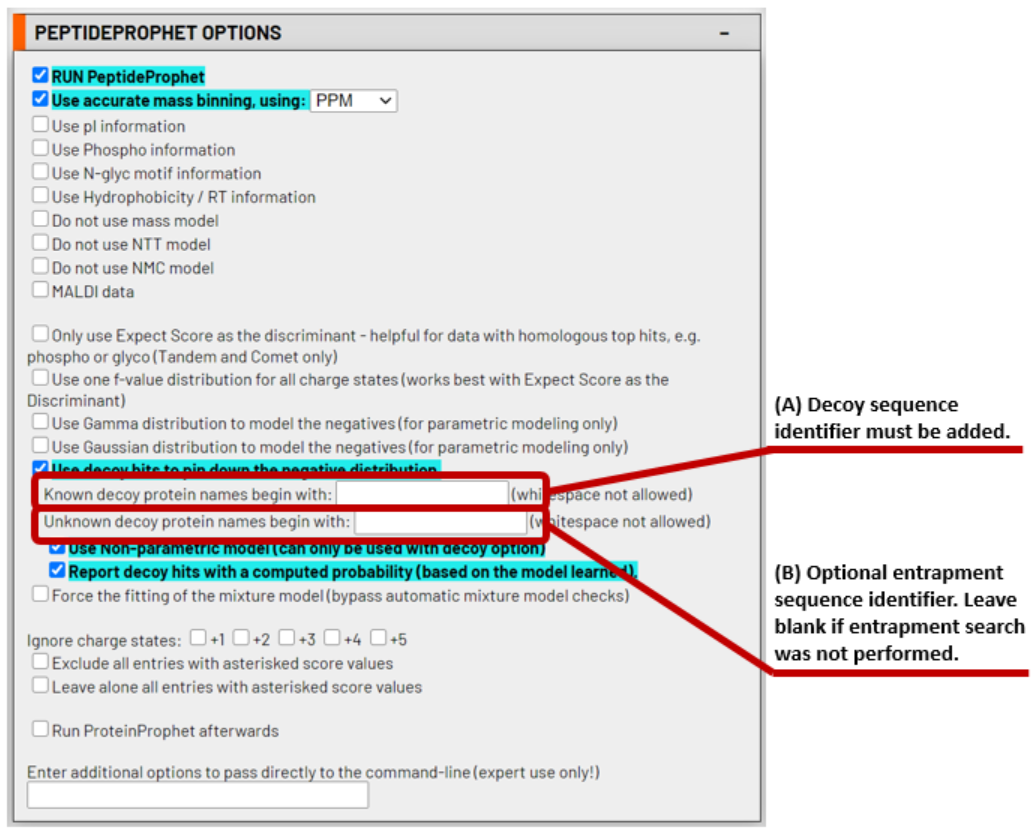
The PeptideProphet parameters are pre-set for typical Kojak results validation. These default parameters usually remain untouched. However, it is essential to provide the decoy protein sequence identifier that you used in your FASTA database, as indicated in (A) in the figure below. If you optionally performed your Kojak search with additional entrapment protein sequences, also indicate those in the field shown as (B) in the figure below. Otherwise, leave it blank.
4. Choose to run iProphet
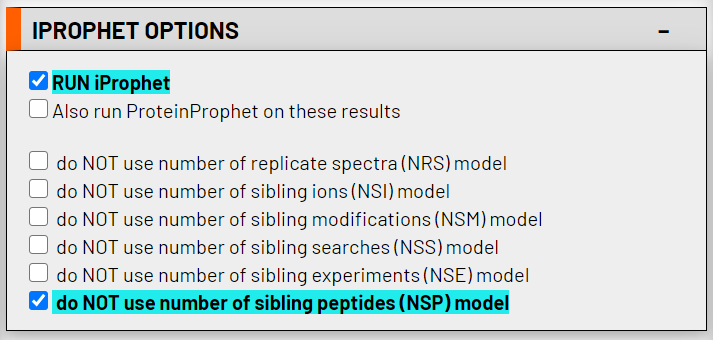
Use of iProphet is optional at this point and can be performed at a later time if desired. For efficiency, you can choose to perform iProphet analysis here. This analysis provides peptide-level statistical validation. To enable iProphet analysis now, simply select the RUN iProphet checkbox. Leave the do NOT use number of sibling peptides (NSP) model option checked.
5. Run the statistical analysis
Scroll past the other tools in this interface to the bottom of the page and click the Run XInteract button. This button will only appear once the appropriate fields on the page have been completed - don’t worry, if you performed steps 1 through 4 above, then you’re all set. PeptideProphet divides the Kojak search results into three subsets: PSMs (single peptide), CSMs (two peptides), and CSMs (single peptide with a loop-link). Each subset is analyzed separately and combined together following analysis.

Filtering and Visualizing the Validated CSMs
Following analysis with PeptideProphet and iProphet, a probability (or iProbability, respectively) is assigned to each spectra. The probability is the likelihood that the CSM (or PSM) is correct, with a value of 1.0 meaning correct and a value of 0.0 meaning incorrect (statistically speaking). A value above 0.5 means more likely correct than incorrect. It is far more useful, though, to determine the probability threshold above which all CSMs have an estimated false discovery rate (FDR). This portion of the tutorial walks through the steps to perform this analysis and export the results to a tab-delimited file. The steps are equivalent for both PeptideProphet and iProphet results (simply exchange Probability for iProbability for the former), but the tutorial will proceed assuming you performed iProphet analysis.
1. Open the PeptideProphet file
This can be done directly from the job status page once the PeptideProphet analysis has completed. Alternatively, you can use the TPP Files tab to navigate to PeptideProphet results pepXML file and open it in the TPP viewer for pepXML files.

2. Filter your results for CSMs
The XLINK_TYPE column in your results indicates the type of PSM or CSM identified, labeled as na for not linked (i.e. single peptide PSMs), loop for loop-link CSMs, and xl for cross-linked CSMs consisting of two peptide sequences. Select Filtering Options from the menu. Near the bottom, change xlink type to xl to filter the results to only display CSMs from two cross-linked peptides.

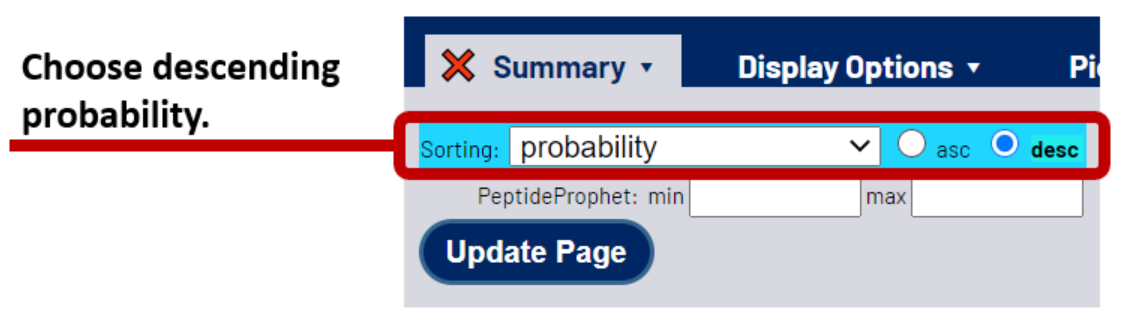
Next, sort your CSMs by probability from highest to lowest. This places the most likely correct CSMs at the top of the list. To do so, select the *Summary tab, then choose probability from the sorting options and select the desc radio button.
3. Find the iProbability threshold for your desired FDR
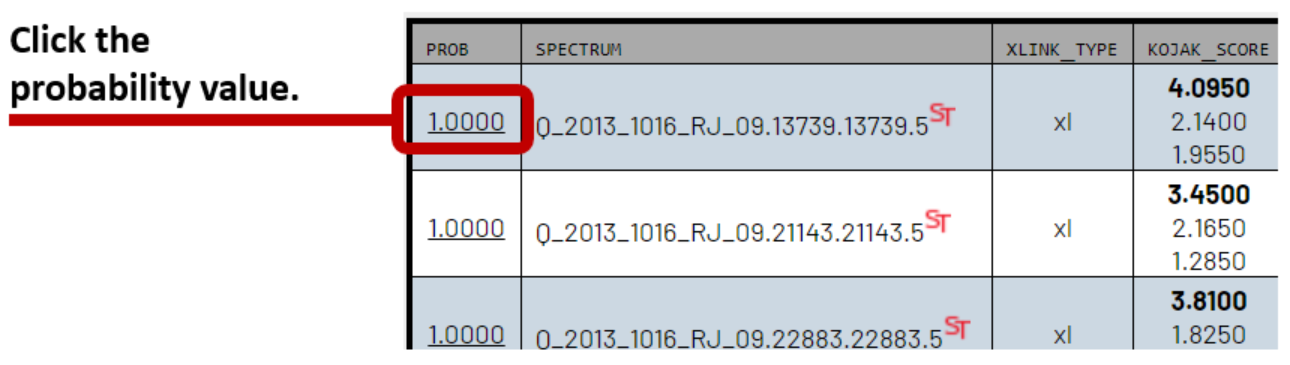
Click on any of the iProbabilities next to the CSMs. Each one is a link that goes to the same PeptideProphet/iProphet Models/Statistics page.
Your browser will open a new tab displaying the analysis and models for PeptideProphet. The page shows individual models for xl, loop, and unlinked CSMs and PSMs. We will focus on the xl models and error predictions. Click on the Sens/Error Tables tab to display the error estimates at various probability thresholds. Find the probability threshold at your desired error rate.
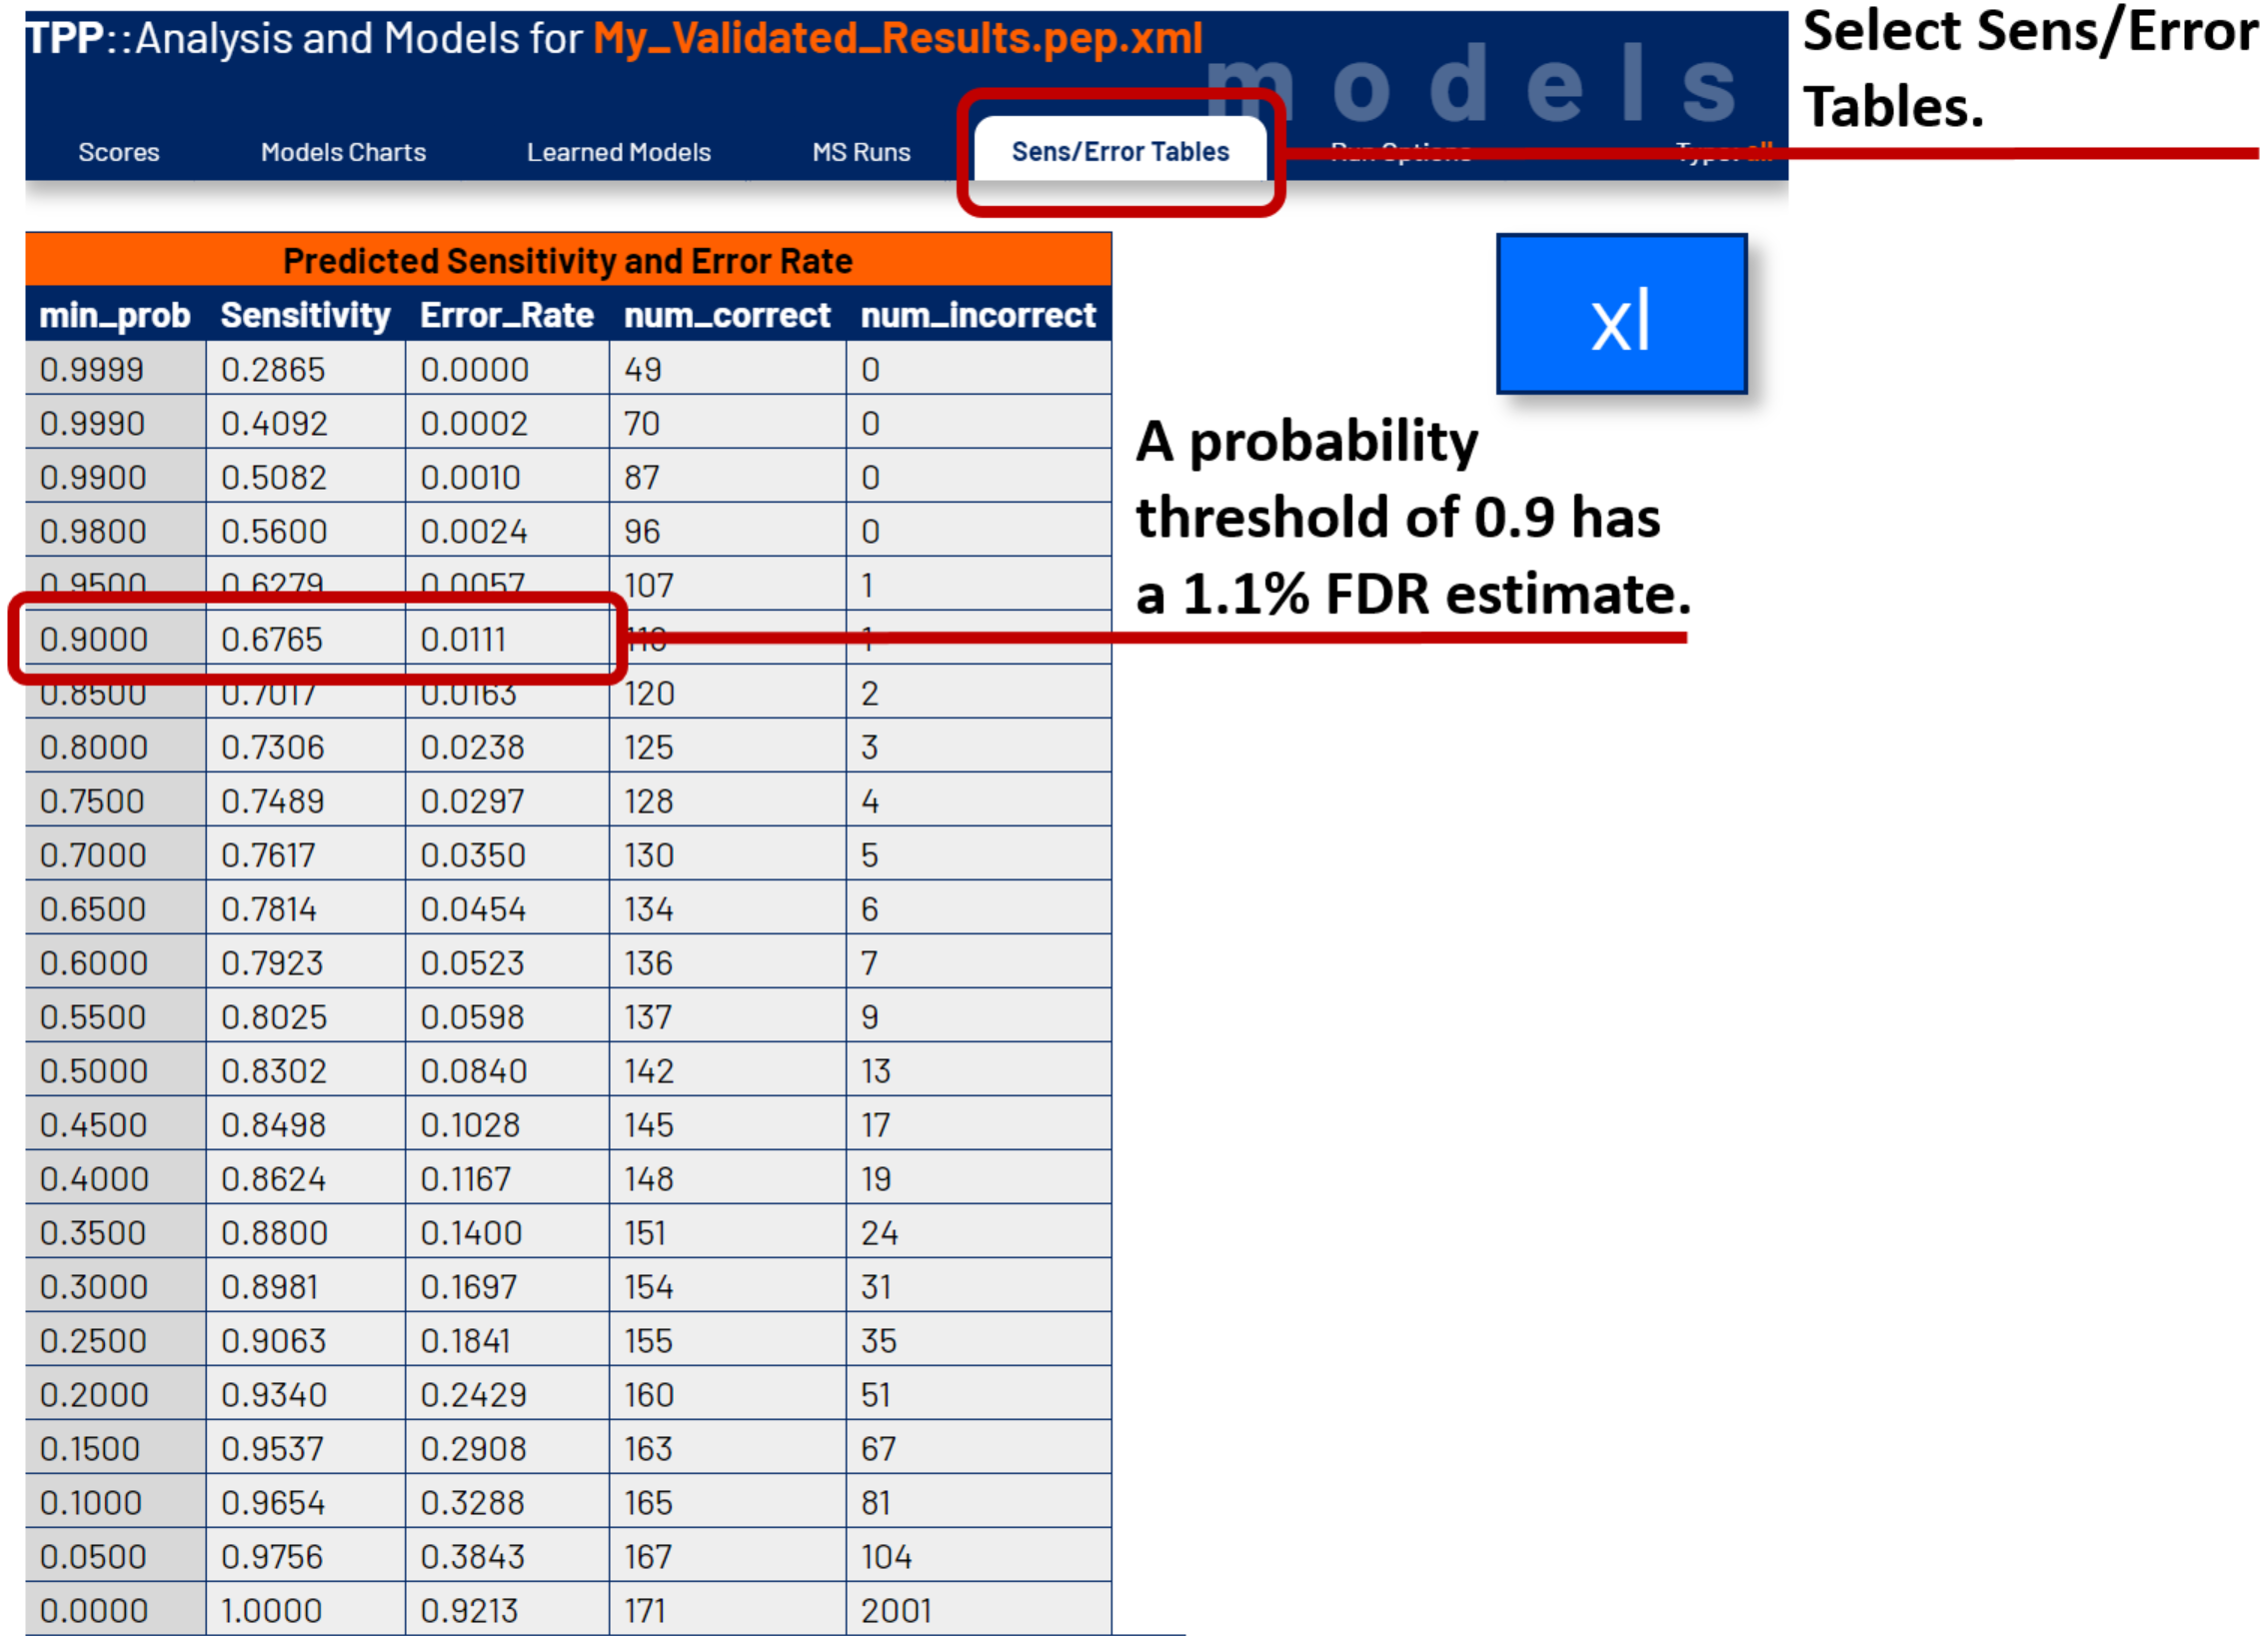
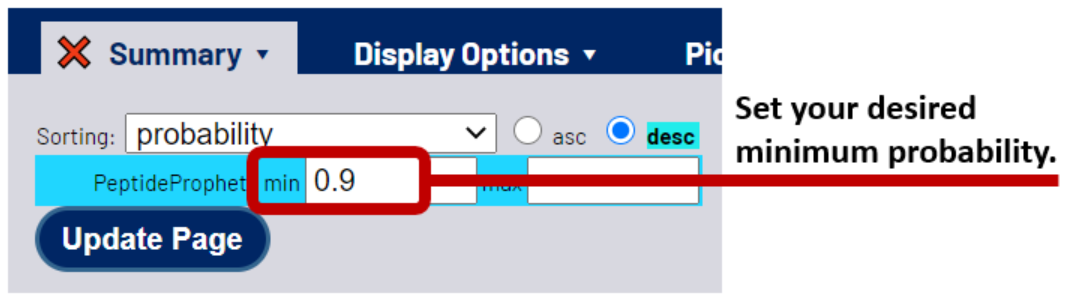
4. Filter your CSMs by iProbability
Return to your PepXML Viewer page. Under the summary tab, type in the probability threshold for your desired FDR. This will filter the CSMs to just those above the probability threshold. Click the Update Page button. You now have a small, filtered list of your most likely correct CSMs.
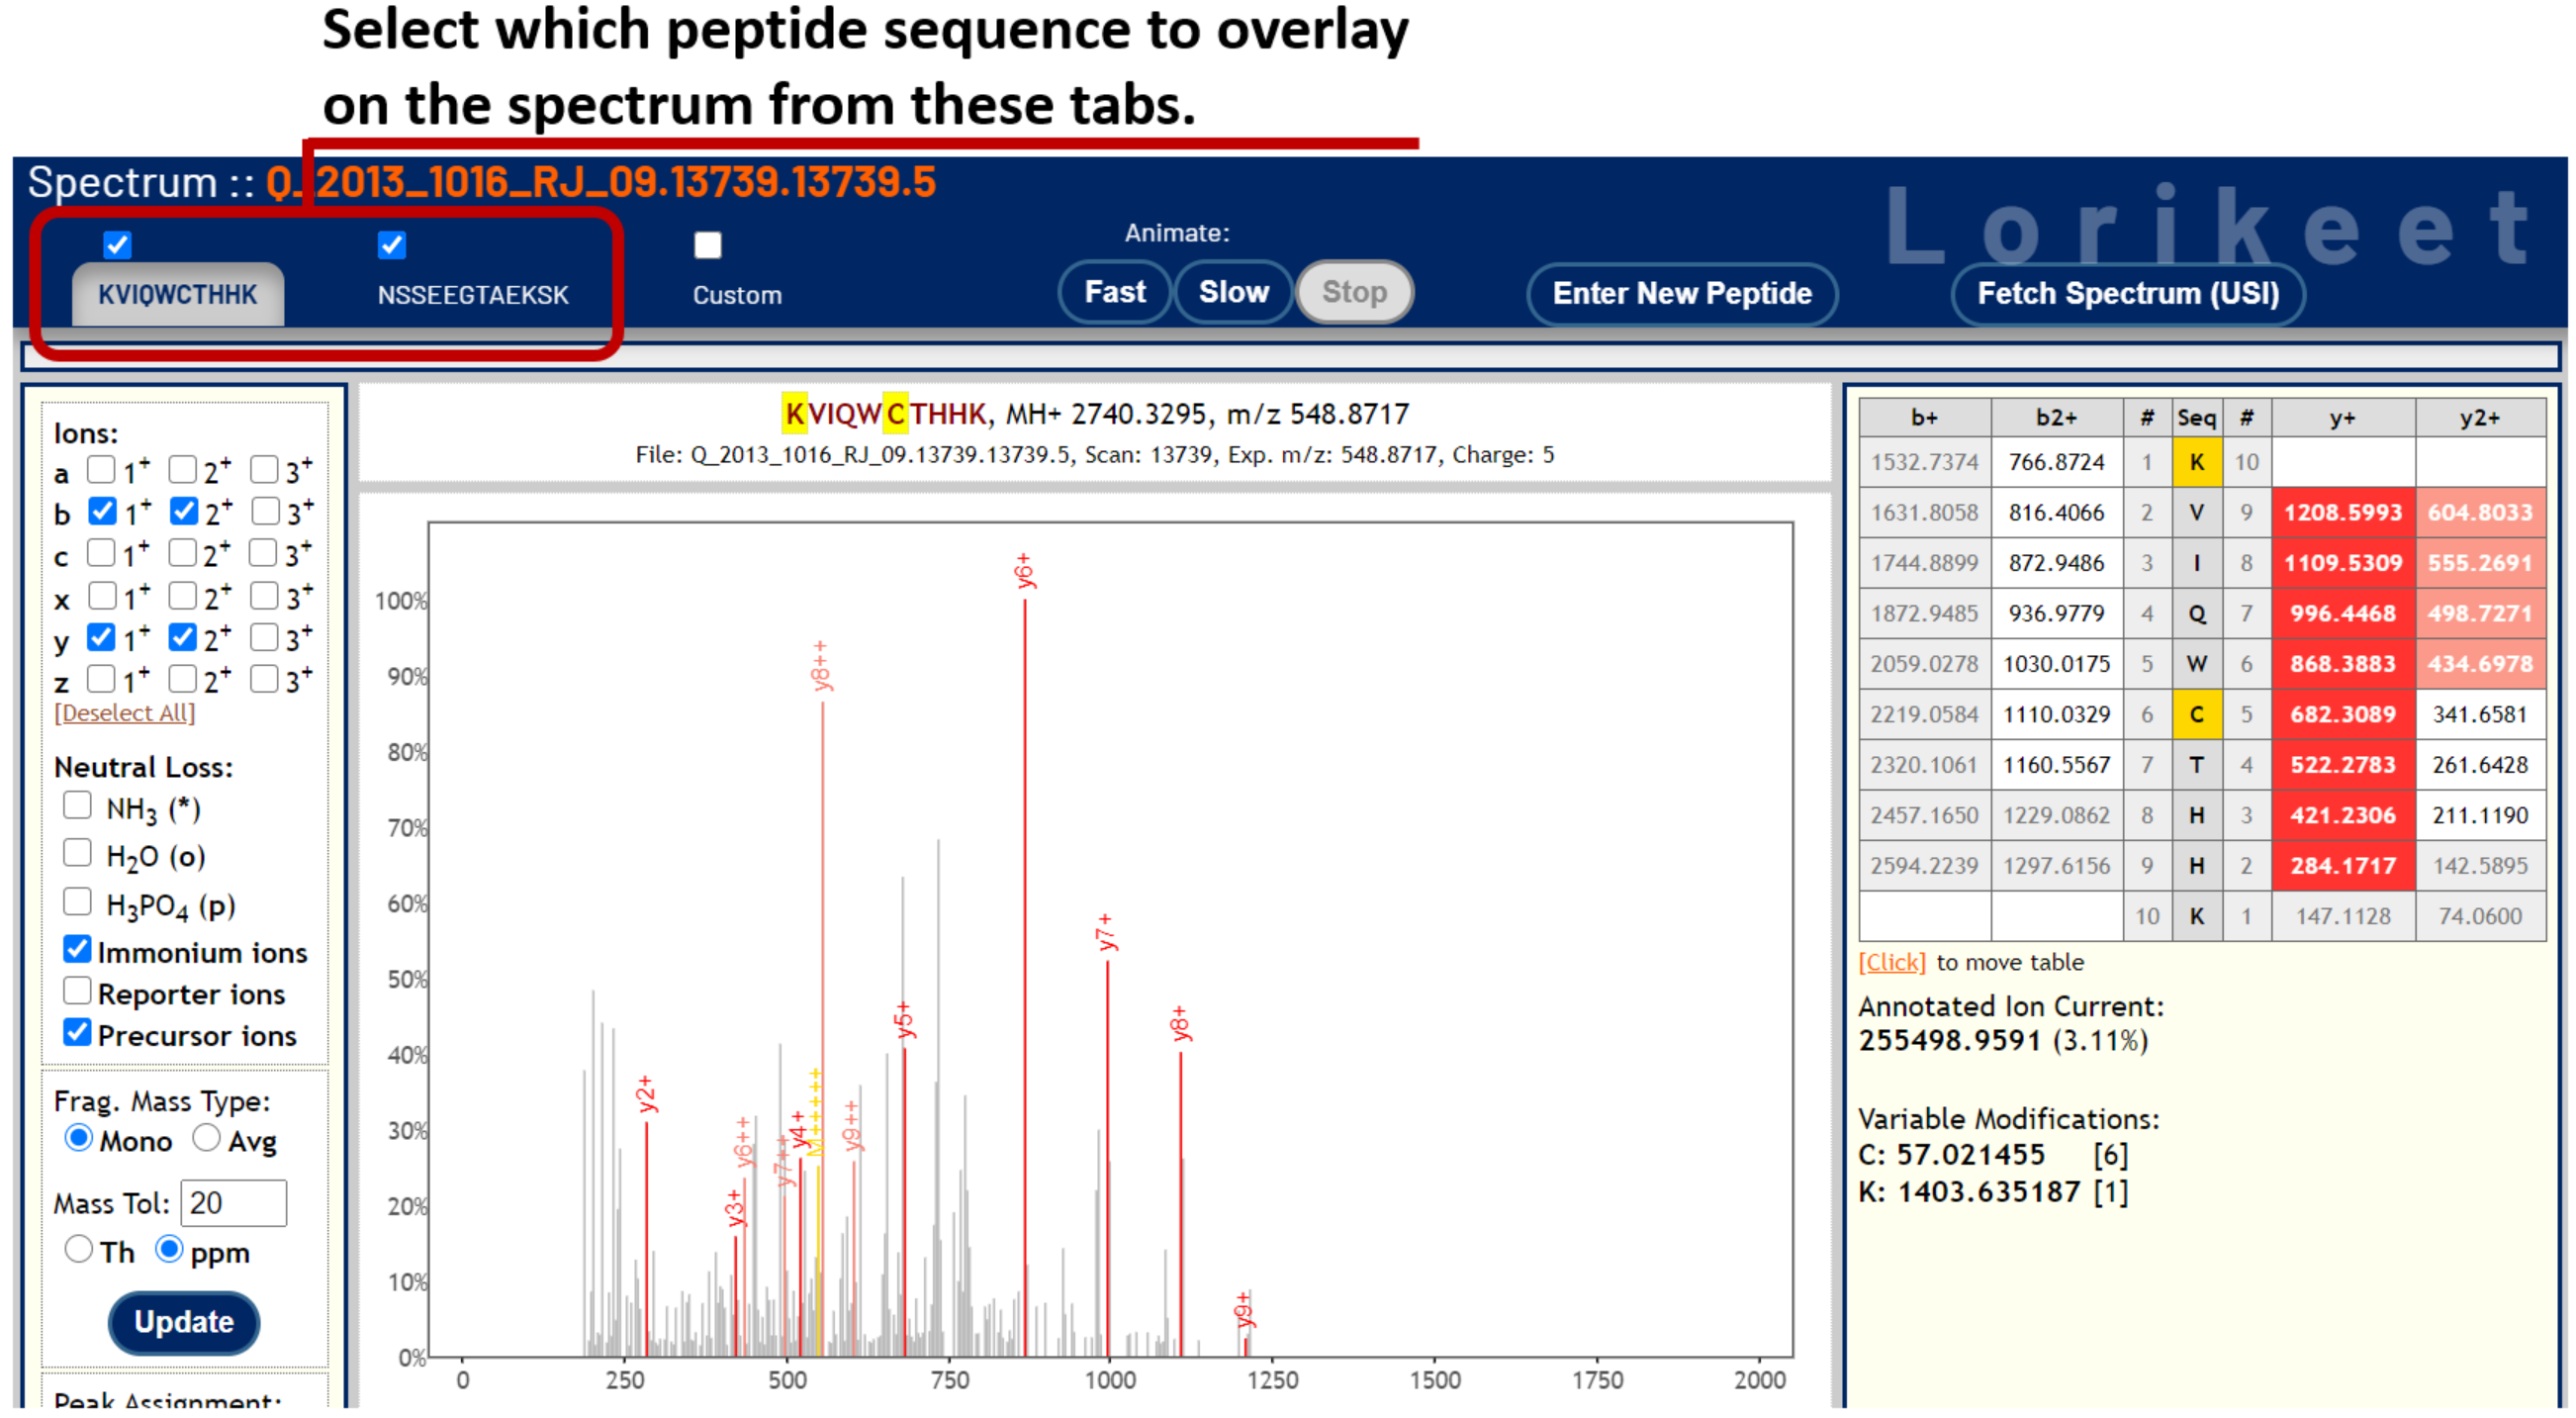
5. View the CSM in the Lorikeet spectrum viewer
To visualize and CSM of interest from the PepXML Viewer, click on the [spectrum] link in the IONS column. This opens a new tab that displays the spectrum and peptide sequences in the Lorikeet spectrum viewer.

The Lorikeet viewer has tabs for each peptide in the CSM at the top of the page. Click the tabs to flip between each sequence to observe the fragment ions belonging to each peptide in the CSM.
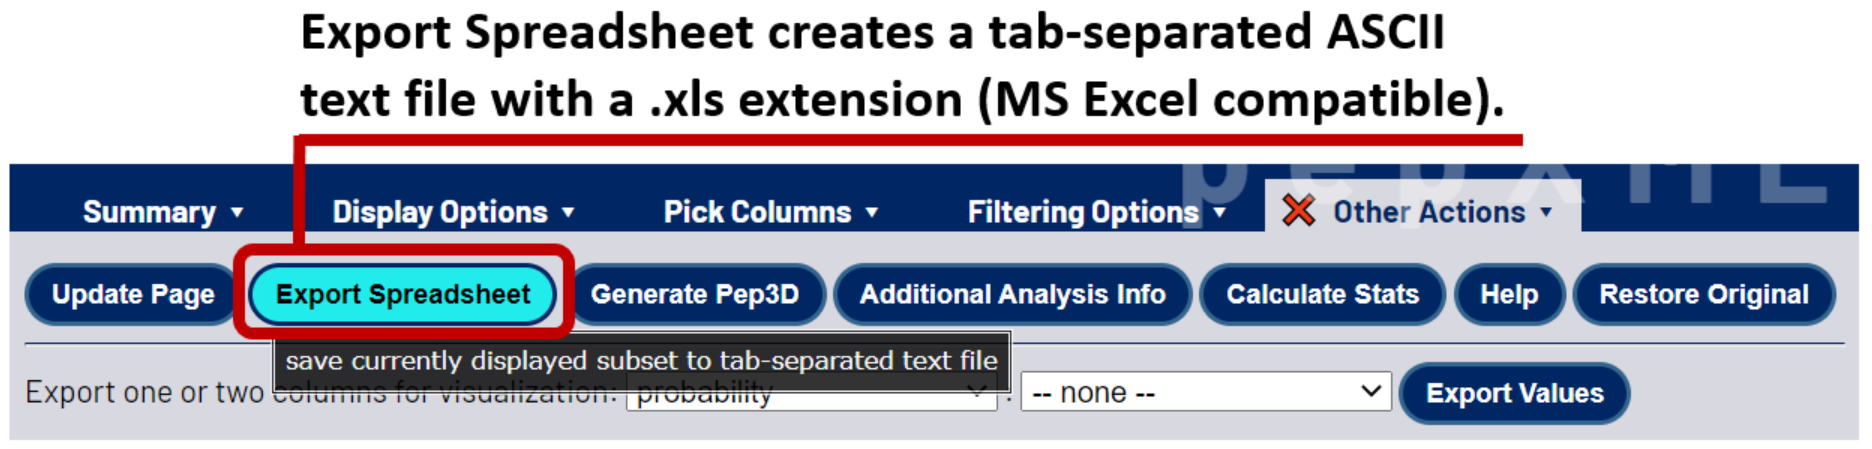
6. Export your results
Once your results have been filtered to satisfaction, you can export a summary of them to a tab-separated spreadsheet that can be viewed in a variety of different software tools. Select the Other Actions tab, then click the Export Spreadsheet button. NOTE: The exported file has a .xls extension for easy single-click opening in Microsoft Excel. Despite this extension, the exported summary is tab-separated ASCII text, equivalent to a .tsv file.
Additional Information
This tutorial is a beginner’s guide to using the TPP with Kojak to search and validate CSM results. There are many advanced features beyond the scope of this tutorial, particularly when optimizing the PeptideProphet models to ensure accurate error estimations for all PSM and CSM types at all observed charge states. To learn more about the TPP and its tools, visit The TPP Website.